Add and delete workpapers
The workpaper index, located on the Workbench, allows you to select workpapers that are relevant to your client. Individual workpaper templates are stored in the cloud. When you select a worksheet, it is downloaded from the cloud and included in your Excel workbook file. You can add required workpapers at the start of the job or as you go – it is up to you!
Ensure you have an Internet connection before trying to download a workpaper.
Add a workpaper
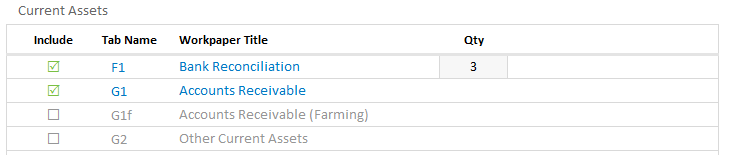
- Go to the workpaper index located on the Workbench.
- Select the check box of the workpaper you want to include.
- Enter a quantity, if required.
- The included sheet will download and be added to your workbook.
Delete a workpaper
- To hide a workpaper: simply clear its check box on the Workbench.
- To permanently delete a workpaper from your workbook: Right-click on the workpaper tab and click Delete.
Note that there are some sheets that need to be deleted as a set. They download as a set due to the number of links between the sheets. These sheets are:
- A1 + A2
- A4 + A5 + IRD benchmarks
- T1 + T2
- Q3a + Q3b
- L1 + L2 + Adjsheet + Adjletter
- U1 + U2
Some of these sheets may not be visible in the workbook. To view hidden sheets right click on any worksheet tab and select Unhide.
Add a custom workpaper
With CCH BFNZWorkpapers you have the freedom and flexibility to add your own customised workpapers.
When you add a customised workpaper a link will be added to the workbench and if required, a row will be generated on the B1 Review Summary,
-
Click the add custom workpaper button.

- Select what type of custom workpaper you want to add:
- Blank Worksheet (Z): Add a generic CCH blank worksheet.
- Import Excel Worksheet: Import a customised worksheet developed by you or your firm.
- Link to a document: Link to a document, such as a bank statement .
- Link to a website: Link to a website, for example client documents stored in the cloud.
- Enter the workpaper title and a unique tab name.
-
Click Add Now button.

- Click the tab name or workpaper title link, on the workbench, to access the workpaper.
- Enter formulas to display the workpaper balance on the B1 review summary:
- On the B1 Review summary, select the grey box in the WP Bal column for the applicable workpaper.
- Enter ‘=’ into the cell.
- Navigate to the custom workpaper by selecting the required tab at the bottom of the screen.
- Select cell which contains workpaper balance.
- Press Enter - the new account will be included in the total value at the bottom of the section.
- Alternatively, manually enter the workpaper balance on the B1 Review summary.