This page contains general instructions on how to customise the default CCH iFirm templates in Microsoft Word.
The following software is required:
- Microsoft Word 2010 is recommended and documented in the help pages.
- Microsoft Word 2007 is also supported but NOT documented in the pages.
- Microsoft Word 2003 is also supported but NOT documented in the help pages - you must download a converter from Microsoft to be able to work with .docx files.
Some or all of these Microsoft Word skills may be required, depending on what you want to customise in a template:
- Working with headers (adding a logo and company details to the header)
- Working with footers (editing the information that must align with the pre-printed stationery)
- Paragraph formatting (alignment)
- Text formatting (customising)
- Inserting and formatting images (customising logo)
- Inserting and editing merge fields (customising body text)
- Table and cell resizing (alignment in the footer)
- Enabling display options (always)
- Copy, save and rename word files (to always keep backup files)
Templates generally have three sections. For example, in a billing template in Practice Manager the header contains your company details, client code and invoice details. The body of the template contains the job details and invoice amount. The footer contains your payment (remittance) advice details.
To open a header or footer for editing, double click at the top or bottom of the page clearly marked with a blue line.
If you are still unable to see the footer and header areas, you must enable white spaces between pages.
- Click File > Options > Display.
- Select Show white space between pages in Print Layout view under Page display option.
In addition to many merge fields, each template contains bookmarks and paragraph marks that are placed within tables. These items are also called non-printing characters, as they will not show in the printed document, such as an invoice. Therefore, they may be hidden when you open a template. You should ensure that all of these items are visible and that you understand the function of each one. This will help you with editing and formatting the template, and prevent the deletion of important information.
Bookmarks
Bookmarks [ ] identify an area where data from your CCH iFirm system will be automatically inserted. If no such data exists, for example, if your client does not have a website, nothing will be inserted into that location and the next bookmark will move into its place. Bookmarks are very important and should NEVER be edited or deleted. They determine whether a row is displayed in the printed letter or not, preventing blank rows in a table.
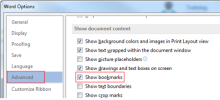
If you cannot see any bookmarks when you open the template:
- Click File > Options > Advanced.
- Scroll down to Show document content.
- Select the Show bookmarks check box.
If you delete a bookmark by mistake, access your backup copy to restore the information.
In the Practice KnowHow module the StandardTextmark bookmark is very important. It is the placeholder where the content from a letter or document template will be placed when you send it to a contact. If you delete this bookmark, or create a new document style template, you can add the StandardTextMark into the document:
- Click where you want to insert the bookmark in your document.
- On the Insert tab, in the Links group, click Bookmark.
- Enter the Bookmark name: StandardTextmark
- Click Add.
Paragraph marks
Paragraph marks ![]() help you to identify and adjust the spacing between paragraphs in the template. If you cannot see them, click the Show/Hide paragraph marks icon on the Home tab.
help you to identify and adjust the spacing between paragraphs in the template. If you cannot see them, click the Show/Hide paragraph marks icon on the Home tab.
Although the content of each template is organised into tables, you will not see the gridlines of the tables when you first open the template. Viewing the gridlines is important to accurately adjust the alignment of the columns and rows of the various tables included in the templates.
- Click Table Tools > Layout > Table.
- Click View Gridlines.
You can add a logo, edit the text, change the layout and more.
If you want to add a logo to your templates, ensure that you resize the image prior to inserting it into the template to minimize the file size. The image requirements are:
- File type of PNG or JPG
- File size below 500 KB
Add your logo to the header section of the document, so you can format it without affecting the body of the document.
- Place the cursor where you want the image to be positioned.
- On the Microsoft Word Ribbon, click the Insert tab, then click Picture.
- Locate and select the required image file.
- Click Insert.
For example, if your logo includes your company name, so you do not need the «companyname merge field. You can delete that merge field from the template and insert your logo instead.
Alternatively, if your logo does not include your company name, so you may want to insert the logo near the «companyname merge field. to do this we recommend you firstly edit the number of cells in the table that hold all of the information.
- Place the cursor in the row that contains the «companyname merge field.
- Right-click > click Split Cells, then click OK to select the default number of columns (2) and rows (1).
- Place the cursor in the empty right cell.
- Insert the image.
You may want to change the default alignment or enable text wrapping.
- Click the image.
- Click the Picture Tools > Format tab.
- If you want to change the alignment of the image, in the Paragraph group, click the required alignment option.
- If you have text below the image that you want to wrap around the image, in the Arrange group, click Wrap Text and select the option that best aligns the image to the text.
You can change the text font type and size. Refer to the Microsoft typography page which lists the font types that CCH iFirm currently supports. Be aware that a large amount of information in the body, or large font size, may cause the letter to print over two pages.
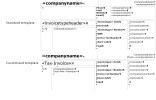
If a template is organised by tables, once the table grid lines are visible, you can adjust the tables to reorganise the contents of the template. This may include splitting or merging cells, or adding or deleting rows or columns. You can then cut and paste the contents to new locations. Be careful not to delete any bookmarks or merge fields. Below is an example of reorganising the layout of the header.
You can edit any of the body text of the template to suit your needs. For example, if you are customising a document style in Practice KnowHow, you could set up a fax document style that looks very different to a letter style. Similarly, if you are customising a billing template in Practice Manager, you could change the default text of "TOTAL" to the terminology used in your company, such as "AMOUNT DUE"
Another example is to change the default text in the Credit Card payment section and then insert an area where clients can fill out their credit card details. Note that this requires the default layout to be edited.
| Standard template | 
|
| Customised template | 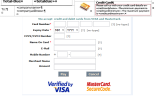
|
Merge fields are place holders that direct Microsoft Word where to insert specific information obtained from CCH iFirm. For example, client details can be extracted from the Contacts module. You can identify merge fields in the document by the open and close markers as follows: «mergefield. Each template uses merge fields relevant to the type of document it prints.
Each CCH iFirm module has its own specific merge fields. To view a list of the available fields, click the following links:
Delete a merge field
We recommend that you do NOT delete any merge fields in the template, unless you are sure you do not require the information it relates to. If you do want to delete a field, ensure you only delete that field and not the one next to it. For example, if you want to delete the «itemdate field, ensure you do not delete the «TableStartDetails field next to it. This common mistake will cause the rest of information to be displayed incorrectly when the invoice is printed.
Insert a merge field
You can insert a merge field if you accidentally delete one or if you want to use an additional one but we suggest you take great care in doing so.
- Place the cursor where you want to insert the merge field.
- Click the Insert tab.
-
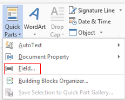
In the Text group, click Quick Parts > Field.
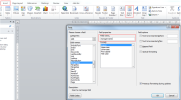
- Select Mergefield in the Field names list.
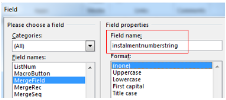
- Type the name of the merge field (from the available merge fields list - see above for links) in the Field name box.
-
Click OK.
Edit a merge field
We recommend that you take great care in editing any merge fields. Changing the field name as it displays in the document will NOT update the merge field, you MUST do this in the field editing area.
- Right-click on the merge field.
- Click Edit Field.
- Change the Field name and Format as required.
-
Click OK.
Change the format of date fields
See the date formatting options available in CCH iFirm.
If the merge field simply inserts today's date, you can easily change the way this date is formatted:
- Right-click the date, then click Edit Field.
- In the Field dialog box, select the Date format you require.
- Click OK.
If the field inserts another date, such as the date an invoice is due, you can change the format as follows:
- Right-click on the merge field, for example «duedate.
- Click Toggle Field Codes to view the format of the merge field in the document.
-
Enter an alternative format - select one from the list of available date formatting options.
Change client related merge fields
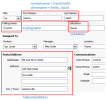
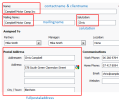
The following screen shots illustrate what information in from the Contacts module is represented by the various merge fields.
If the client is an Individual:
If the client is a Company, Trust or Partnership:

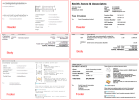




_thumb_0_100.png)
_thumb_0_100.png)

